Wistful Dreams Studio
Customizing Tips
Home | Customizing Tips
Here is the step-by-step process, with some pictures, of how I customized a Breyer Stablemate New Mold Clydesdale. I keep a log of all my customs, and what I do with them, in Microsoft Word; when I am done, I put his show name at the top. There is a description of who he started life as, then what kind of shape he was in when I acquired him. I then proceed to log what I have done, and I try to take a picture of every step. I do not currently have the file space to show every picture, so I have taken the same position, and taken pictures of certain steps. I do most of my detail work with a dremel. I also use a few clay tools, but prefer to only use them on the forelock, or in hard to reach areas of the mane and tail. I prefer to use Apoxie Sculpt as my sculpting medium; it drys hard, and will stick to anything! I have to be especially careful of my sculpting tools, as it will stick to them, and is VERY hard to get off! I have ruined a glass bowl, using it as my finger dipper! Questions? Email me! Janice
Click here to see the tools I use.
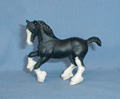
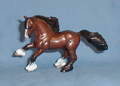
#5651 "B" Shire New Mold acquired 4/24/04
Name: Andrei Akila (Brave Eagle in Russian). He will be showing as a Vladimir Russian Draught horse...Bay, large blaze, 3 socks. He is whole, but has scratches in his paint.
What I have done:
- Sanded seams. (5/14/04)
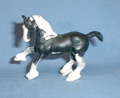
- Cut (with a mini saw—can use the dremel) and bent with candle flame R front knee; moved leg up. Carved ears, hooves, and nostrils; ground down feathers on R leg on top of hoof and recarved them a bit to look more natural for that position. (5/15/05)
- Cut and bent L front leg up and forward at knee. Cut and broke L rear leg below elbow...then pinned and glued it in new position. Added Apoxie Sculpt in all the cut joints, and added a thin layer to bridge of nose and muzzle...his original muzzle was a little flat. (5/16/04)
- Ground his mane off, and carved out nostrils again after Apoxie added to bridge of nose and muzzle. Ground off a touch of his legs where the move made plastic stand up in the wrong places....Sanded Apoxie joints on legs smooth. (5/19/04)
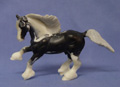
- Added new Apoxie mane, added Apoxie to neck to smooth out old mane removal areas, and added more Apoxie to joints to connect moved legs better. Added a new forelock, in addition to his existing one. (5/20/04)
- Carved out detail in mane, and sanded smooth the neck areas, legs, and all seams. (5/24/04)
- Added more Apoxie to tail to get the flip. (6/4/04)
- Ground out tail. (6/5/04)
- Primered with white primer...4 light coats...and stopped because I could already see problem areas; sanded those areas (groin, back, both flanks, sheath, nose). The swirls from the original mold process were showing up too pronounced, so I attacked the major ones. Also, noticed his forelock seemed to go down under his jaw, so took the dremel and ground that out; and ground under his cheekbones and chin. (6/5/04)
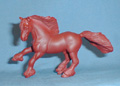
- Primered a rust colored primer—3 coats. (6/6/04)
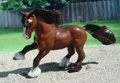
- Painted on base coat, then proceeded to paint him Bay: with Bay streaked Black mane & tail; 3 white feathered socks (not L rear); white blaze with slight pinking on muzzle; and 3-colored eyes, with eyewhites. Sprayed a bad layer of clear coat matte finish...one coat...that clogged and got a little rough in the finish. (6/10/04)
- Had to do 3 spots of touchup where I scratched his paint with my fingernails. Sprayed 2 coats of gloss finish. Repainted grey hooves cream. Sprayed 2 more coats of gloss finish. (6/11/04)
- Pasteled stripes and dots into hooves. Touched up a pinprick on inside R rear elbow, and added grey chestnuts. Sprayed with 2 more coats of Gloss finish. Finished. (6/14/04)
Copyright wistfuldreams@earthlink.net